| Bass and cello necks have a fundamental
design weakness
that often becomes a problem. |
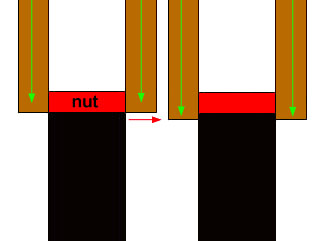
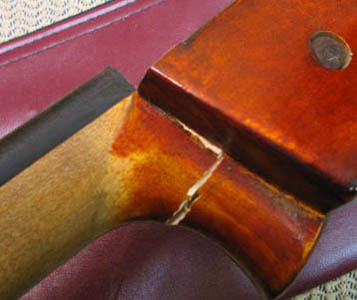 . . The heel becomes cracked through and the cheeks of the pegbox no longer have anything to keep them from pulling forward under string tension. Like this:
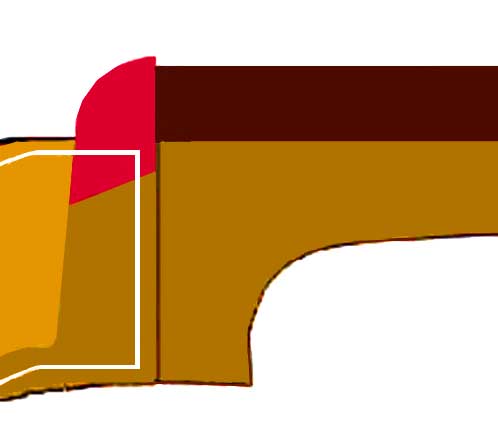
Since the cheeks project past the sides of the neck, there's ordinarily nothing much to keep those cheeks from pulling forward under string tension. When the wood breaks, which happens easily, you have trouble. Here's a simple scroll repair that involves installing a different kind of nut (shown below, in red). In the case of a bass, you have to begin by taking the tuners off, to get the plate (the whitish outline in the sketch below) out of the way. Afterwards, though, the tuner plates will help cover the scene of the crime. First, you glue everything back as it was before the break. Then you reinforce the repair. The idea is that the new nut acts as a transverse bar which bears the forward pressure of the cheeks of the pegbox, which was formerly held back by nothing but the lateral strength of the grain of a little bit of the wood beneath the nut, and distributes that load differently. |
 |
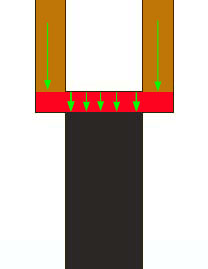
| The new nut receives and then transfers all that forward
pressure of
the pegs and scroll to the barrel of the neck, which is a combination
of
the neck itself and the fingerboard which is presumably firmly glued to
it. In other words, that breached and reglued bit of maple beneath the
ends of the nut no longer has to do all or even much of the work.
The nut in the top sketch is a bit exaggerated, but setting it down some below the neck/board seam at the end of the fingerboard, as in the sketch, is probably a good idea. This way the scroll pressure is bearing on both maple and ebony. Basically the back of the nut should elide with the plane of the inside of the scroll box, as shown in the sketch in x-ray vision, in the top sketch. The nut should be a pretty tight fit, so there's no slack to begin with. Even a very tight glue joint will flex under that much tension, and the less flex that's possible, the stronger and more durable this repair will be. I've not had a single failure with this technique. It's way better than pins, bolts, dowels (particularly), and it's fairly easy to do, too. It's also easy to make it cosmetically acceptable, for all that's really different visually is the ends as they're mortised down into the scroll a bit, and most of that is covered up by the plates of the machines. Q: Are you saying that there is no need to pin the chin of the scroll?
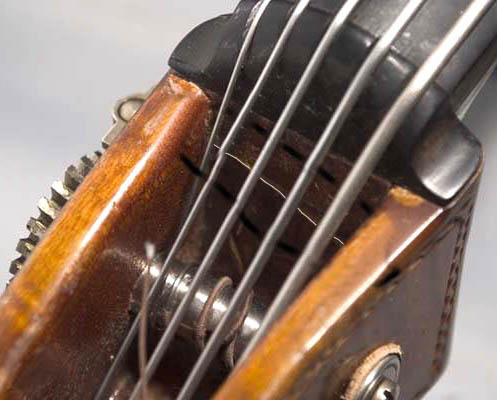
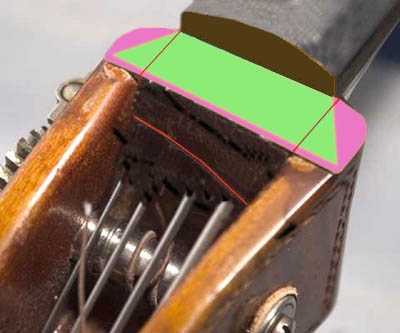
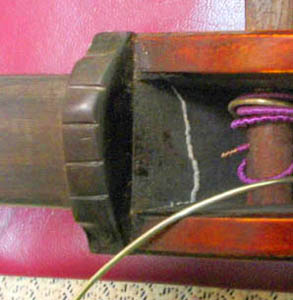
Basses take a beating, and need all the help they can get. The above repair is what I would consider fairly elegant and one that I would do to almost any instrument, since it's reasonably aesthetic and surefire. Sometimes the aesthetics of the side of the pegbox need to be preserved, as below. Notice the nice carved border.
In the shadows below the nut you can see the crack. Five strings! Here's how to possibly do the same repair invisibly:
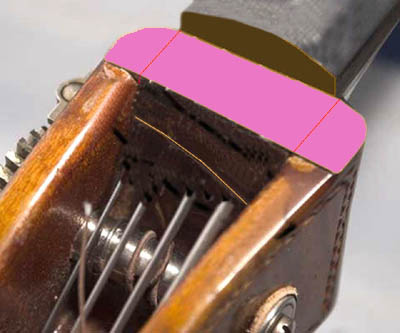
Remove the nut. Note the red lines indicating the cracked cheeks.
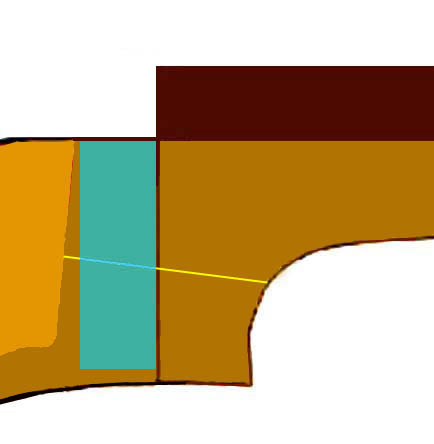
Next, inlay a deep trapezoidal 'key' of very hard wood
spanning all
the cracks under the nut. The grain should run side to side, so the
string force of the scroll is bearing on the slab of the key and that
pressure is being transferred to the barrel of the neck itself.
Side view of the same. You're looking at the endgrain of the
concealed key, blue-green. This key needn't really go much lower than
the crack itself, since it's the area above the crack that does all the
work. (It would approach overkill, but if you wanted maximum
strength from this key, you could laminate it from three layers of hard
wood with the grain of the layers at angles, so no cracking would be
possible.) Afterwards, put a nut back on over it. The repair will be completely enclosed and invisible. The effect of the repair will be the same as the inlaid nut above. I would use a good 12-hour epoxy, well mixed, for this, because it fills gaps and remains absolutely hard. Here's a bit about the two main base-of-neck repairs I
encounter, and
how I deal with them in less expensive instruments:
 This is a very reliable, if
inelegant, repair.
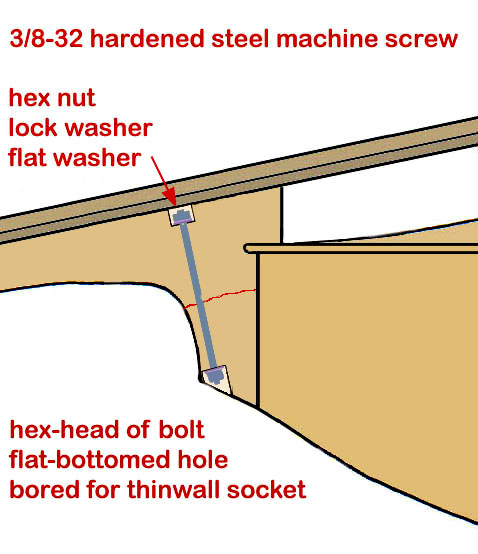
The image pretty much says it all. First I remove the fingerboard (I
really
dislike the look of a plug in the board itself), then glue the neck
back
together. Then I make the holes for fitting the ends of the bolt. The
end
holes need to be flat-bottomed, so the cap and nut of the bolt are
bearing
on solid platforms of maple, and just deep enough to allow everything
to
fit in there - the head and nut, washers and so. The end holes need to
be made first, and in sufficient diameter to receive a thinwall socket
that fits the head and/or nut of the bolt.
Then I drill a hole through that's precisely fitted to the shaft of the bolt, starting at each end from the centers of the larger holes, aiming to connect the two holes in the middle. This is more easily eyeballed with a power drill than you might think. Note: the end holes can be situated in such a way as to allow
you to
angle the through-bolt back and fairly close to the in-curve of the
heel
too:
I expect wood to compress over time and I expect to possibly have to tighten the bolt (I at least wish that to be an option). Therefore I situate the cap of the bolt at the heel, and a nut with a lock washer under the board itself. This way, the plug or cover in the heel can be removed and the cap of the bolt can be tightened if necessary, which is easier and much less messy than removing the fingerboard. Once the connecting 3/8" (or whatever) hole is drilled, the bolt is installed and tightened to the max. Reattach the fingerboard, cap the hole in the button, and so on.
Even when high school kids drop the bass down the stairs and the neck comes loose again, this plate will keep it together until help arrives. -
 You'll have to rework the head of a serious machine screw for this. Some other hybrid approach of the ones above may be called for. Here's a sketch of the cauls and clamping method which make it possible to glue a neck back on (or back together) with a single clamp. Notice the angle of the cauls at the red arrows. The green arrows show the way those cauls are inclined to slip under pressure, which augments their tightening and resists slippage. 
There are some really elegant approaches to repairing damaged
necks,
but they take a lot more time. This is a repair I have done on a
few good cellos that had the ultimate nasty break through the heel
higher
up. These were ones that I didn't want to insult with a bolt or
something.
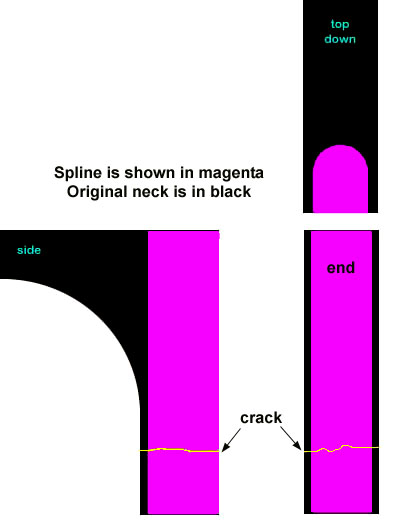
It's a maple spline that I make with a router from something like full 1X stock. With the fingerboard off, and the neck off and the heel glued back on, I make a jig to hold the neck and route a round-bottomed channel with a matching router bit for the spline that runs the entire height of the heel. Once the spline is glued in, you trim it top, face and bottom, to the original surfaces of the neck, and reattach the neck to the body. There is nothing visible once it's reassembled except in the overstand under the board, which you can conceal pretty easily (only trolls hang out under there anyway). Since the spline now constitutes 80% of the volume of the heel, it will never move, or if it does, it will all move in concert. That crack will never budge. I leave a small (1/64) gap at the ends of the spline so the sleeve of original maple can breathe a little without the spline pushing on the button or the underside of the board. In the right instruments, this is time well spent, of course.
It's solid and invisible. The ones
above, with bolts, are only for instruments in schools with little or
no
repair budget. Questions? Drop me a line: click here 
|